地理围栏就是当你的手机设备进入或者离开某个区域的时候进行消息提醒,它会让你的程序变得更cool,设想一下,当你离开家,或者靠近一家你喜欢的商场附近时,能够及时给你发送最新的或者最优惠的信息。
在这个教程中,你将会学会如何用region监听区域,这个工程是采用swift3语言实现的。
为了练习,你将要创建一个位置点去提醒app调用地理围栏进行提醒,假想它们就是现实世界中的位置坐标。好了,让我们开始吧。
开始
下载这个开始工程,这个工程提供了简单的在地图上添加/删除 地图注解(Annotation)的方法
编译运行程序,你将会看到一个空白的地图:

点击+按钮,去添加一个新的地理围栏,首先会打开一个新的页面,你可以设置你想要的位置坐标,点击Add就添加到了地图上,并且大头针显示
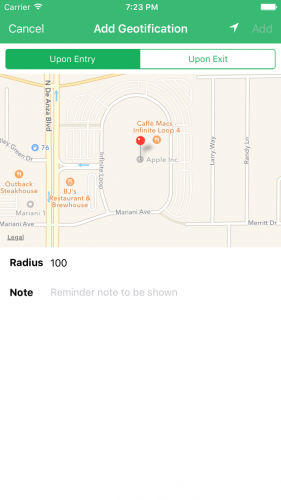
这个radius代表指定地点的半径范围,单位是米
note在导航过程中,能够展示你想要展示的任何内容。
这个App也能够设置触发提醒方式,当用户进入或者离开某个区域的时候,进行提醒。
对radius设置1000,并且设置note为Say Hi to Tim!,选择触发类型为Upon Entry,然后点击Add
然后你将要看到的地理围栏已经出来了一个新的大头针在地图上,下面还有一个圆形的渲染图层

点击这个大头针,将会显示详细信息,比如提示信息和半径大小,不要点击左边的删除按钮,因为点击之后这个地理围栏信息将会被删除掉从地图上和内存中
注意: 所有的地理围栏的信息都存储到了NSUserDefaults中
设置 Location Manager和权限
你添加到地图上的地理围栏仅仅是能看的,但是不能进行消息提醒。
你将要修复这个通过core location来进行监听
打开GeotificationsViewController.swift,然后在类的顶部定义一个常量实例CLLocationManager:
1 2 3 4 5 6 7 8 9 | |
下一步,替换viewDidLoad()中为下面的代码:
1 2 3 4 5 6 7 8 9 | |
我们解析下代码:
- 设置locationManager的代理,只有设置了代理,相关的代理方法才会被调用
- 你调用了
requestAlwaysAuthorization()方法,它会调用一个提示,"Always"总是允许使用定位服务,因为App一直需要拥有Always权限去进行地理围栏的监听,直到这个app不在运行的时候,就不再需要这个权限了。在info.plist中已经设置了消息去告诉用户当请求定位信息时必须设置key:NSLocationAlwaysUsageDescription - 调用
loadAllGeotifications(),转换存储在NSUserDefaults中的地理围栏的信息,然后加载它们,这个方法加载地图上所有的地理围栏和大头针的数据
当app设置了用户权限之后,界面上将会显示NSLocationAlwaysUsageDescription提示,一个友好的提示为什么app需要请求用户的地理坐标。这个key是强制性假如你使用定位服务的话,如果这个key没有的话,系统将会忽略程序请求并且终止定位服务

OK,你已经设置好了app的请求权限,点击Allow去允许location manager在合适的时机调用代理方法
在你实现地理围栏的提醒之前,这里有个小的问题你必须解决:用户的当前坐标没有展示在地图上,这个特性是不能实现的,你必须手动的点击左上角的那个定位按钮,才能定位到当前用户的地理坐标。
幸运的是,修复这个是很容易的-在你允许了app获取权限之后,仅仅需要点下那个定位按钮
在GeotificationsViewController.swift,添加CLLocationManagerDelegate的扩展如下:
1 2 3 4 5 | |
不管什么时候用户的权限状态改变的时候,location manager都会调用locationManager(_:didChangeAuthorizationStatus:)代理方法。假如用户授权app去使用当前定位服务,在你初始化好后locationManager,并且设置了代理之后,这个方法将会被调用
这个方法是个理想的地方去检查这个app是否被授权,如果是,你将能确保mapView展示当前用户的坐标
编译运行这个app,如果你用真机测试,你将会在mapView中看到当前的坐标;如果你运行在模拟器上,点击 Debug\Location\Apple 来查看地图上的标记

放大地方,你看到的将会是这样:

注册你自己的地理围栏
当你的location manager配置好了之后,下一步就是允许你的app去注册一个地理围栏用来被监听
在你的app中,你的地理围栏的信息是被存储为Geotification模型,在你注册为被监听之前,core Location 请求每一个地理围栏去返回一个CLCircularRegion实例。为了去处理这个请求,你将要创建一个helper方法,然后从指定的Geotification对象中返回一个 CLCircularRegion
打开GeotificationsViewController.swift,然后在主体代码中添加如下方法:
1 2 3 4 5 6 7 8 | |
上面的方法做的工作如下:
- 你用地理围栏的坐标进行
CLCircularRegion的初始化,这个地理围栏的半径和identifier允许ios去判断注册的地理围栏的距离,这个初始化是很简单的,Geotification模型已经包含了要请求的属性。 CLCircularRegion实例也需要设置两个BOOL值得属性,notifyOnEntry和notifyOnExit,这是两个标识,当设备进入或者离开指定的地理围栏的时候,定义的地理围栏的回调事件将会被触发,你也可以为你的每个地理围栏设计去响应一个消息通知,你可以设置一个是true,另外一个是false,前提是你需要使用Geotification实体的枚举值
下一步,当用户添加坐标的时候,你需要一个方法去开始监听这个地理围栏
添加下面的方法在GeotificationsViewController:
1 2 3 4 5 6 7 8 9 10 11 12 13 14 15 | |
让我们一步一步讲解上面的方法:
isMonitoringAvailableForClass(_:)方法决定我们的设备是否支持监听地理围栏,假如不能够监听,程序将会返回并且弹出一个提示框进行提醒。- 下一步,你检查当前权限的状态,确保这个app已经被授权去请求用户的定位服务,加入这个app没有被授权,这个设备将不会接受到地理围栏的任何提示信息。然而,在这个案例中,你将要始终允许用户去保存地理围栏信息,因为当你的app没有权限的时候,core loaction会让你注册地理围栏。当用户权限给这个app的时候,监听这些地理围栏将会自动开启
- 在之前定义的方法中,你创建一个
CLCircularRegion实例从指定的(geotification)中。 - 最后,你用Core Location注册监听
CLCircularRegion实例
当用户删除地理围栏的时候,你同样需要停止监听
在GeotificationsViewController.swift中,添加如下方法:
1 2 3 4 5 6 | |
这个方法执行调用locationManager去停止监听CLCircularRegion通过geotification对象去判断
现在你已经完成了开始和停止的方法,当你不管什么时候添加和删除geotification,你将会调用到这两个方法
首先,在GeotificationsViewController.swift中找到addGeotificationViewController(_:didAddCoordinate)方法,这个方法是一个代理方法,在创建geotification的时候调用;
当创建一个新的新的Geotification通过 AddGeotificationsViewController,同时更新mapView和geotifications的集合,然后调用saveAllGeotifications()进行数据保存,最新的数据是被保存到NSUserDefaults中。
现在,替换为下面的代码:
1 2 3 4 5 6 7 8 9 10 | |
- 你调用了location manager的
maximumRegionMonitoringDistance属性和半径值进行比较,如果半径值超过了这个属性值,则获取该属性值,反之则取半径值,这是重要的一点,因为任何大于最大值的半径将会引发监听程序失败 - 用core location对新创建的geotification进行监听,通过调用
startMonitoringGeotification(_:)方法,参数为geofence
通过这些代码,这个注册的App是有能力去进行监听,然而,有一个限制,作为地理围栏是和系统资源共享的,Core loaction要求每个设备最多只能注册20个地理围栏。
添加如下代码在updateGeotificationsCount()方法中:
1 2 3 4 | |
这行代码意义就是当数量达到限制数量值得时候,导航栏的Add按钮将会变成不可用状态
最后,让我们处理删除地理围栏的操作,这个函数是在mapView(_:annotationView:calloutAccessoryControlTapped:)这个代理方法中进行处理的,当用户点击每一个annotationView的左边的delete按钮的时候,将调用删除地理围栏的处理函数
添加停止监听的方法在mapView(_:annotationView:calloutAccessoryControlTapped:)代理方法调用的时候:
1 2 3 4 5 6 7 | |
添加声明去停止监听地理围栏通过传递geotification参数,在删除之前,请先改变NSUserDefaults中存储的值
通过这个方法,你的App可以停止监听地理围栏。
编译运行,你不会看到任何改变,但是这个App已经注册成了地理围栏的监听并且可以监听该区域,然而,它还不能响应任何的地理围栏的监听事件,不要着急-那就是你下一步需要做的事情.

响应地理围栏的事件
你将要实现一些当发生错误时的代理方法,当发生错误的时候这些代理将会被调用.
在GeotificationsViewController.swift中,添加CLLocationManagerDelegate的代理方法:
1 2 3 4 5 6 7 | |
这些代理方法仅仅是打印一些日志信息,当location manager发生错误的时候
下一步,打开AppDelegate.swif,在这里你将要添加一些代理用来处理和响应当设备进入或者离开事件
首先你需要导入Corelocation框架
1
| |
确保在AppDelegate的顶端中有CLLocationManager的实例:
1 2 3 4 5 6 | |
替换application(_:didFinishLaunchingWithOptions:)中的实现:
1 2 3 4 5 | |
你设置你的AppDelegate去接收地理围栏的事件,你可能好奇,“为什么我要用AppDelegate去替换ViewController呢?”
注册了一个地理围栏随时都在监听,包括当这个App停止运行的时候。假如这个设备是在App停止运行的时候去触发,ios将会自动进入后台运行模式,这使得AppDelegate是一个理想的地方去处理这个事件,这个时候ViewController可能不会被加载。
现在你可能还会好奇,“新创建的CLLocationManager实例是如何知道去监听地理围栏的呢?”
你的app注册的地理围栏是很容易去监听的,所以不会担心你的locaion Manager是什么地方初始化的。
现在你只需要实现代理方法去响应地位围栏的事件信息,在你做这些之前,你将要创建一个方法去处理地理围栏的事件。
添加下面的方法在AppDelegate.swift中
1 2 3 | |
在这个方法中,传递一个CLRegion参数,并且打印一个日志声明,稍后你将会实现这个事件处理。
下一步,在AppDelegate.swift的扩展中,添加下面的代理方法:
1 2 3 4 5 6 7 8 9 10 11 12 13 14 | |
当你的设备进入CLRegion区域时,locationManager(_:didEnterRegion:)方法将会被调用,当你离开该区域时,locationManager(_:didExitRegion:)方法将会被调用
两个方法都会返回CLRegion,你需要去检查并且确保它是CLCircularRegion,因为返回有可能是CLBeaconRegion,假如你的App使用iBeacons来进行监听的。
假如你的region属于CLCircularRegion返回之内,你将会调用handleRegionEvent(_:)
现在你的App是能收到地理围栏的事件了,你要准备去测试它的准备性,如果这个不足以让你兴奋,因为在这个教程的第一次测试,你想要看到一些结果;
测试你的App最精确的方式是用真机,添加一些地理围栏并且进行走路或者驾驶汽车测试,然而,现在做这些有些不明智,因为你不能去验证打印的日志信息当用真机改变了地理位置之后,另外,在你提交一个大头针之前,它不能很好的保证App的工作。
幸运的是,这里有一个更容易的方式去做这个,你不用离开你舒适的家。
Xcode允许你包含一个WayPoint文件在你工程中,你能用Monique去测试地点位置。很幸运吧,你在你工程中导入这个文件即可。
打开TestLocations.gpx这个文件,检查下这个内容:
1 2 3 4 5 6 7 8 9 | |
这个GPX文件一个XML格式的,包含两个waypoints:Google’s Googleplex in Mountain View and Apple’s Headquarters in Cupertino.
用模拟器运行工程,当App加载这Main View Controller时,回到Xcode,在Debug bar中选中Locationt图标,选择TestLocations

回到App中,点击导航栏上的左上角的Zoom按钮,定位当前位置,一旦你放大这个区域,你将会看到定位点在Google 像素点和 Apple像素点 来回移动。
添加两个地理围栏去测试这个App,Apple坐标和Google坐标,(如果之前你添加过其他的地理围栏,请先删除之前的,再开始)
为了测试这些地点,添加具体细节如下:
- Google:Radius: 1000m, Message: “Say Bye to Google!”, Notify on Exit
- Apple:Radius: 1000m, Message: “Say Hi to Apple!”, Notify on Entry

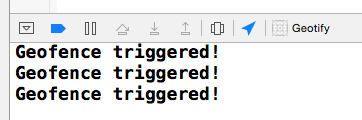
一旦你添加了地理围栏信息,你将会看到每次当坐标点进入或者离开地理围栏的时候,控制台都会打印日志信息,如果你按下home键或者锁屏让App进入到后台,你将会看到日志信息每次都会打印,现在你可以很显然的验证之前的判断
用通知来响应地理围栏事件
你已经有了很大的进步,当你的设备通过这个地理围栏的时候,你可以发送一个通知提示用户。准备好做下这个操作
为了获得通知消息,你可以通过触发CLCircularRegion来获得,你需要获取一个地理围栏信息从NSUserDefaults存储的数据中,在已经注册的地理围栏中,你可以用这个唯一的identifier去找到正确的CLCircularRegion。
在AppDelegate.swift中,添加下面的帮助方法:
1 2 3 4 5 6 | |
这个方法会从持久化的内存中找到地理围栏的消息,仅仅靠identifier,就会返回地理围栏的消息
在application(_:didFinishLaunchingWithOptions:)添加如下方法,去注册一个通知:
1 2 | |
你添加的提示权限是为了确保这个App能否发送通知
现在,替换handleRegionEvent(_:)的内容:
1 2 3 4 5 6 7 8 9 10 11 12 13 | |
当这个App激活的时候,出现主界面的时候,将会弹出一个alert提示信息
编译运行工程,当坐标点经过你添加的地理围栏的时候,你的地理围栏事件将会被触发,将会受到一个提示信息,并且展示出来:

按一下home按钮,使得App进入后台模式,你依然能够通过地理围栏的事件信号定期收到通知信息

现在,你已经有完整的功能,定位提示功能在你的App中,你可以添加其他的大头针,然后去到你添加坐标的地方测试~
最终工程
最后的工程你可以在这里下载